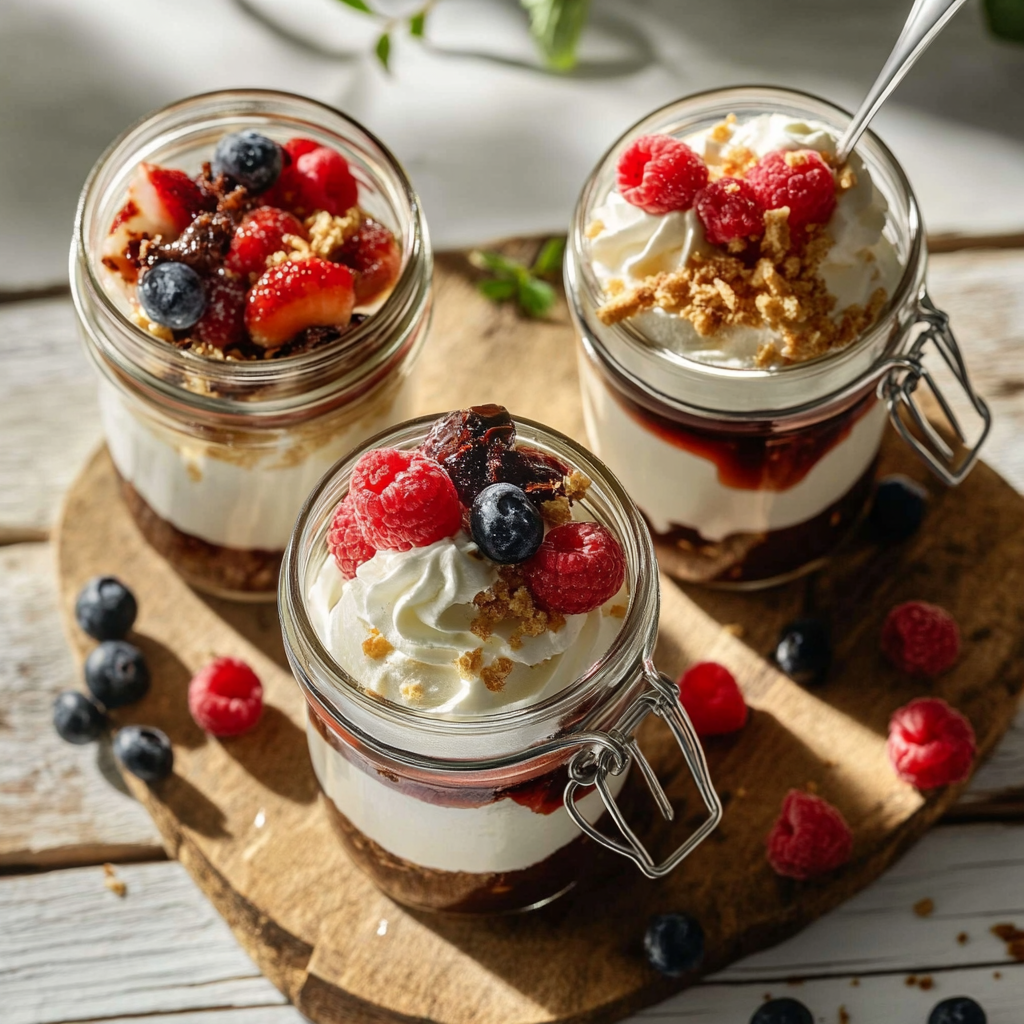

🍓 Layered Bliss: Picnic Dessert Jars to Go! 🧺✨
Hey there, fellow food adventurers! ready to spill the tea (or should I say, custard?) on my latest obsession: Layered Picnic Dessert Jars. Picture this: golden shortbread crumbs, velvety cream, and juicy berries stacked like edible rainbows in a jar. These little guys aren’t just desserts—they’re portable happiness, perfect for sunny park days, beach hangs, or even backyard BBQs where you’d rather chat than fuss with plates.
Now, I’ll let you in on a secret—I’m a sucker for anything that combines crunch, cream, and fruit. But what really sold me on these jars? Their no-fuss, all-flair vibe. No slicing, no serving drama—just grab a spoon and dive in. Plus, they’re basically foolproof. Whether you’re a kitchen newbie or a seasoned pro, these jars are your ticket to “oohs” and “aahs” without breaking a sweat.
So, why should you trust me with your picnic plans? Well, last summer, I whipped up a batch for my squad’s rooftop hang. Let’s just say… the jars were empty before the sunset. One friend even tried to lick hers clean. (No judgment—I’d do the same.) Ready to make magic? Let’s layer up!
When Life Gives You Berries… Make Jar Desserts! 🌞
Let me take you back to my first jar dessert triumph. It was a scorching July afternoon, and my besties were coming over for a “lazy girl picnic” in the park. I wanted something refreshing but indulgent—no melting ice cream, no crumbly pies. Then it hit me: layers. Layers never let you down.
I raided my pantry: leftover shortbread from tea time, a handful of pistachios, and a fridge full of berries. The custard? Straight from my Sunday scone ritual. I tossed it all into jars, crossed my fingers, and hoped for the best. Fast-forward to picnic o’clock: my crew unscrewed the lids, and silence fell. Then came the chorus: “ this is *chef’s kiss*.” Mission accomplished. The best part? We recycled the jars as mini vases for wildflowers. Zero waste, maximum vibes.
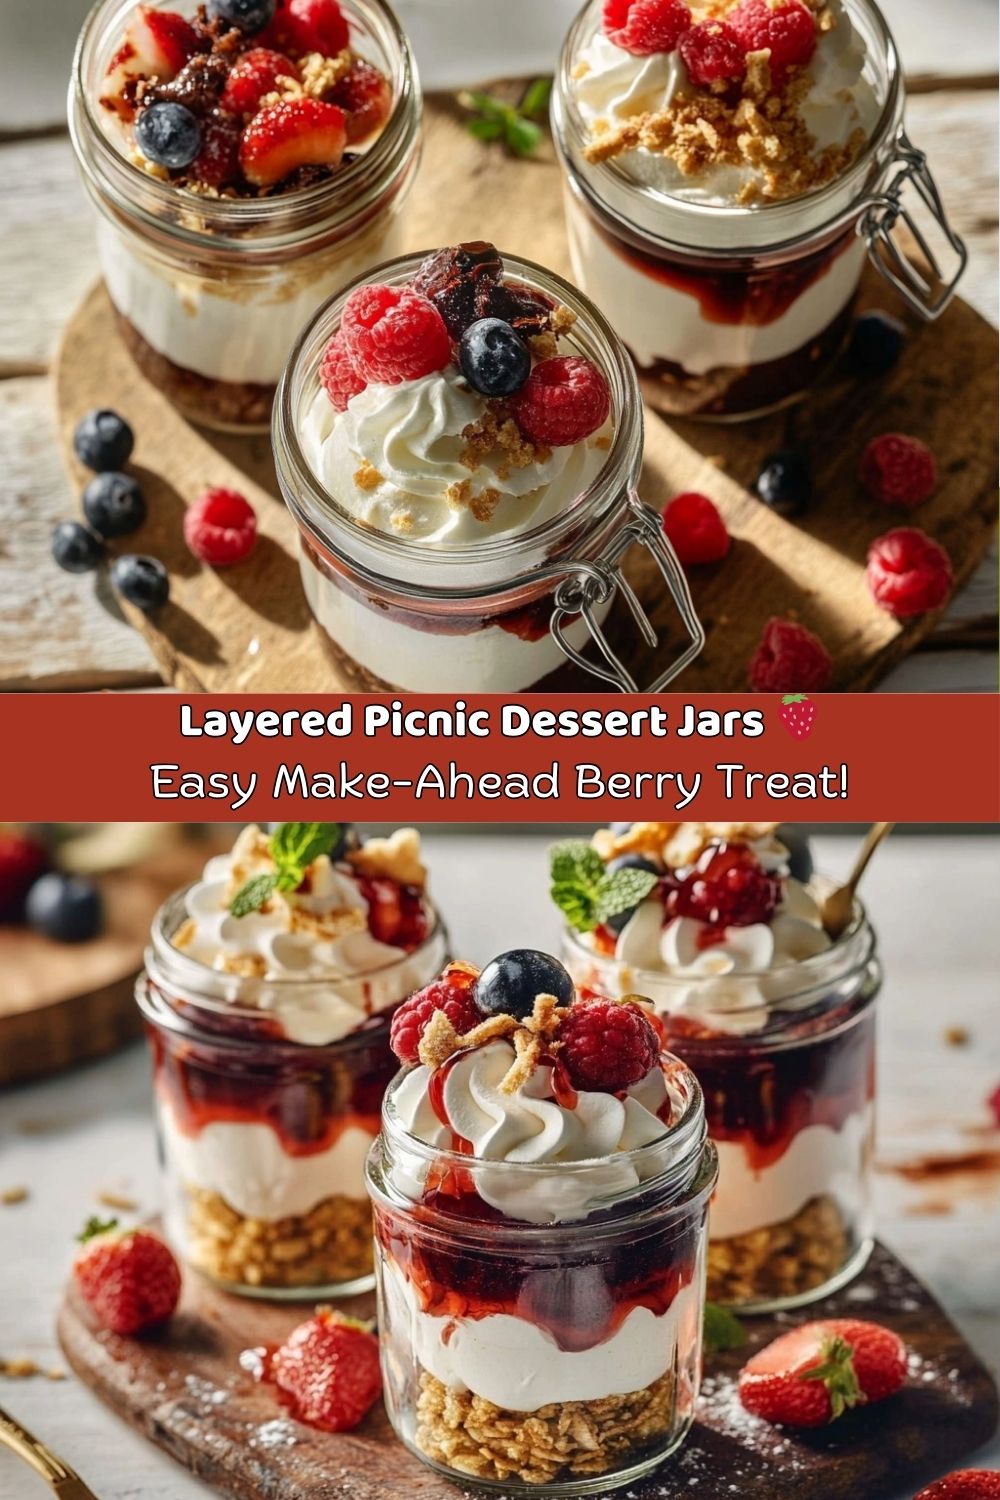
Your Jar Squad: Ingredients & Swaps 🛒
- Shortbread biscuits (25g): Buttery, crumbly magic. Swap with graham crackers or gluten-free biscuits.
- Pistachios (15g): Adds a nutty crunch. Almonds or walnuts work too! Skip for nut-free.
- Melted butter (2 tbsp): Binds the crust. Use coconut oil for a vegan twist.
- Mixed berries (strawberries, raspberries, blueberries): Fresh or frozen! Swap with mango or peaches in summer.
- Strawberry conserve (4 tbsp): Bonne Maman is my ride-or-die, but any jam works.
- Elderflower cordial (1 tbsp): Secret floral zing! No cordial? Use honey or orange juice.
- Soft cheese (100g): Cream cheese’s tangy cousin. Mascarpone or coconut yogurt for dairy-free.
- Vanilla custard (125g): Store-bought = smart. DIY if you’re fancy!
- Crème fraîche (75g): Lighter than whipped cream. Sour cream or Greek yogurt in a pinch.
Let’s Build Those Layers! 👩🍳
- Crush & Mix: Smash shortbread into chunky crumbs (pro tip: use a rolling pin or… wine bottle). Stir with pistachios and melted butter. Press into jar bases—this is your edible “floor.”
- Berry Fiesta: Gently toss berries with conserve and elderflower cordial. Let them mingle 5 mins—they’ll get saucy and sweet!
- Cream Dream: Whisk soft cheese, custard, and crème fraîche until silky. Pipe or spoon over the crust. (Piping bag hack: use a ziplock with a corner snipped!)
- Layer Up: Alternate cream and berries. Repeat! End with cream for that Insta-worthy top.
- Chillax: Refrigerate 1-2 hours (or overnight). Patience = layers that stay put!
- Top It Off: Add fresh fruit, crushed nuts, or a mini shortbread cookie. Boom—edible confetti!
Serve with Sunshine 🌼
Pop these jars into a picnic basket with reusable spoons and napkins. Pair with sparkling lemonade or iced tea! For home vibes, line them on a wooden tray with wildflowers. Pro tip: Tie mini ribbon spoons to the jars for extra charm!
Mix It Up! 🔄
- Tropical Twist: Mango + coconut cream + macadamia nuts.
- Chocoholic’s Fix: Add cocoa powder to cream, layer with brownie bits.
- Vegan Vibes: Coconut yogurt, agave, and gluten-free crumbs.
- Autumn Edition: Spiced apple compote + cinnamon custard.
Confessions from My Kitchen 🍴
Funny story: Once, I forgot the custard. Panic mode! I subbed in vanilla pudding… and my friends didn’t notice. (Shh!) Over time, I’ve learned: these jars are forgiving. Too much berry juice? Let it drizzle! Crust too thick? Call it “rustic.” The real magic? They evolve with your mood—or your fridge’s contents!
Your Questions, My Answers ❓
Q: Can I make these ahead?
A: Absolutely! They’re better after chilling overnight—just add toppings last-minute.
Q: Soggy crust SOS!
A: Pack toppings separately, or add a thin chocolate layer between crust and cream.
Q: No elderflower cordial?
A: Swap with 1 tsp vanilla extract + 1 tsp lemon zest. Still delish!
Nutritional Nibbles 🍎
Per jar: ~260 kcal, 14g fat, 25g carbs, 4g protein. Indulgence with a berry boost!
🍰 Final Thoughts: Spoonfuls of Joy, Wherever You Go
These picnic dessert jars aren’t just cute—they’re a little love letter to summer. Packed with layers of crunch, cream, and fruit, they’re the kind of treat that says, “I showed up, and I brought flavor.” Whether you’re picnicking in the park, lounging on your patio, or simply channeling sunshine in your kitchen, these jars turn ordinary days into something deliciously memorable.
The real magic? They’re endlessly flexible. You can swap in whatever’s hanging around in your pantry, go wild with seasonal fruit, or dress them up with a drizzle of honey and edible flowers. No pastry skills? No problem. These jars are basically dessert training wheels—with style.
And hey, if one layer slides or your cream-to-berry ratio gets a little rebellious… embrace it. That’s the charm of jar desserts—they’re supposed to be fun, unfussy, and a little messy in the best way.
So next time you want a treat that looks fancy, tastes heavenly, and travels like a dream, you know what to reach for. Grab your spoons, your jars, and your crew—it’s time to layer up and dig in. 💕