
Sharing is caring!
Table of Contents
ToggleIntroduction to Jimmy Johns and Their Famous Bread
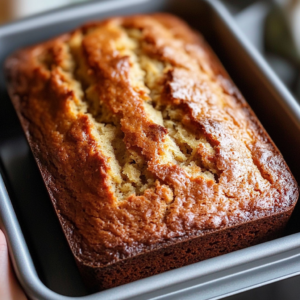
Discover the secret behind the Jimmy Johns bread recipe, a key ingredient to the brand’s widespread acclaim. Renowned for its distinctive sandwiches, Jimmy Johns has captivated taste buds across the nation, primarily due to its exceptional bread. This introductory piece sheds light on the origins and unique qualities of Jimmy Johns bread, setting the stage for an adventurous journey into recreating this culinary masterpiece at home.
The Jimmy Johns bread recipe stands out in the world of sandwich breads. Its unique texture, blending a soft, airy inside with a slightly crisp crust, has become a signature trait of Jimmy Johns sandwiches. This balance is not a mere coincidence but the result of a carefully crafted recipe and precise baking techniques. The bread’s flavor and texture are not only pivotal to the taste of the sandwiches but also embody the brand’s commitment to quality and consistency.
In this exploration, we delve into what makes the Jimmy Johns bread recipe so special. From the selection of ingredients to the baking process, every step contributes to the bread’s distinct character. We also touch upon the brand’s history, tracing the journey of how this bread became a cornerstone of Jimmy Johns’ success. This introduction is not just a story about a recipe; it’s a gateway to understanding the art and science of bread-making that has captured the hearts of many.
As we embark on this culinary exploration, we invite you to uncover the secrets of the Jimmy Johns bread recipe, a blend of tradition, innovation, and passion that transforms a simple loaf of bread into an iconic element of a beloved sandwich chain.
The Appeal of Jimmy Johns Bread: What Makes It Unique?
The Jimmy Johns bread recipe encapsulates a remarkable culinary delight, setting it apart in the vast world of sandwich breads. The appeal of this bread lies in its distinctive texture and flavor, a direct result of a meticulously perfected recipe. Unpacking what makes Jimmy Johns bread so special reveals the careful blend of quality ingredients, precise baking methods, and a commitment to consistency that defines the brand.
At the heart of its uniqueness is the texture – a soft, pillowy interior encased in a lightly crisp crust. Achieving this balance is no small feat. It demands precision in every step, from mixing to baking. The Jimmy Johns bread recipe is a testament to the art of bread-making, where attention to detail transforms simple ingredients into something extraordinary.
Flavor plays an equally important role. The bread’s subtle, yet distinct taste complements a variety of sandwich fillings without overpowering them. This versatility is a key factor in its popularity, making Jimmy Johns sandwiches a go-to choice for many.
Moreover, the bread’s consistency across Jimmy Johns outlets speaks volumes about the brand’s dedication to quality. Whether you’re in New York or California, the bread’s signature taste and texture remain constant, a reliability that fans have come to trust and love.
In essence, the Jimmy Johns bread recipe is more than just a formula; it’s a culinary philosophy that values quality, consistency, and a delightful eating experience. It’s these elements, woven together with skill and care, that make Jimmy Johns bread not just unique, but a standout in the competitive world of fast-food bread.
Check Out More Bread Recipes
Step-by-Step Guide: Preparing Your Own Jimmy Johns Bread at Home
Embarking on the journey to recreate the iconic Jimmy Johns bread recipe at home is both exciting and rewarding. This step-by-step guide offers a clear pathway to achieve the same delightful texture and taste that Jimmy Johns is famous for. Ready your kitchen, and let’s dive into the art of making this exceptional bread.
1. Gather Your Ingredients: The foundation of the Jimmy Johns bread recipe lies in its simple, quality ingredients. Start by assembling flour, yeast, sugar, salt, and water. The purity and freshness of these ingredients are key to capturing the authentic flavor.
2. Mixing the Dough: Begin by combining the yeast, sugar, and warm water. Let it activate for about 10 minutes until frothy. In a large bowl, mix the flour and salt, then gradually add in the yeast mixture. Stir until a dough forms.
3. Kneading to Perfection: Transfer the dough to a floured surface and knead for about 10 minutes. The goal is a smooth, elastic dough – the hallmark of good bread.
4. The First Rise: Place the dough in a lightly oiled bowl, cover with a damp cloth, and let it rise in a warm spot. This should take about an hour, or until it doubles in size.
5. Shaping the Loaf: Punch down the dough gently, then shape it into a loaf resembling Jimmy Johns’ distinct shape. Place it on a baking tray lined with parchment paper.
6. The Second Rise: Allow the dough to rise again, this time for about 30 minutes. This step is crucial for achieving that light, airy texture.
7. Baking Your Bread: Preheat your oven and bake the bread until it’s golden brown and sounds hollow when tapped. This usually takes about 25 minutes.
8. Cooling and Enjoying: Let the bread cool before slicing. This patience pays off, ensuring the perfect texture and flavor.
By following these steps, you’ll bring the Jimmy Johns bread recipe to life in your own kitchen. The result? A loaf that not only rivals the original but also fills your home with the aroma of freshly baked bread.
Mixing the Dough: Secrets to Achieving the Right Texture
Mastering the Jimmy Johns bread recipe starts with the crucial step of mixing the dough, where achieving the right texture sets the foundation for the perfect loaf. This process, steeped in simplicity and precision, is the key to replicating the much-loved texture of Jimmy Johns bread.
Begin with Quality Ingredients: The journey to perfect dough begins with high-quality, fresh ingredients. Use strong bread flour for its higher protein content, essential for the dough’s structure and chewiness. Fresh yeast, fine granulated sugar, and pure water are equally important to get the chemistry right.
Activating the Yeast: Kickstart the process by dissolving sugar in warm water, then sprinkling yeast over it. This step is vital. The water should be warm – not hot – to activate the yeast without killing it. Wait for it to become frothy, signaling life and readiness to work its magic.
Mixing Flour and Salt: In a separate bowl, whisk together the flour and salt. This ensures an even distribution of salt, which controls yeast activity and adds flavor.
Combining Ingredients: Make a well in the center of your flour mixture and pour in the activated yeast. Gradually draw in the flour from the sides, mixing steadily. This gradual incorporation is key to developing gluten, which gives the bread its structure.
Kneading to Perfection: Once combined, transfer the dough to a floured surface. Knead with confidence and rhythm. Push, fold, turn – a dance of sorts with your hands. This action develops gluten further, leading to a dough that’s elastic and smooth.
Rest and Test: After kneading, let the dough rest. It should be soft, pliable, and slightly tacky but not sticky. A gentle press with a finger should leave an indentation that slowly springs back.
By following these steps, you’re not just mixing ingredients; you’re setting the stage for the unique, delightful texture that defines the Jimmy Johns bread recipe. This is where the transformation from simple ingredients to a mouth-watering loaf begins.
The Rising Process: How Time and Temperature Matter
Mastering the rise is a pivotal step in perfecting the Jimmy Johns bread recipe. This phase, where time and temperature play critical roles, is essential for developing the bread’s signature texture and flavor. Understanding and controlling these factors will bring you closer to achieving that distinctive Jimmy Johns loaf in your own kitchen.
The First Rise – Developing Flavor and Texture:
After kneading, the dough needs a warm, draft-free environment to rise. The ideal temperature for this is around 75°F (24°C). In this first rise, the yeast ferments the dough, creating gases that make it expand. This not only builds the bread’s structure but also develops its flavor. Let the dough rest until it doubles in size, which usually takes about an hour. Patience here is key; rushing this step can lead to underdeveloped flavors and textures.
Punching Down – Strengthens the Dough:
Once doubled, “punching down” the dough is crucial. This step releases excess gases and distributes the yeast for even fermentation. It also strengthens the gluten network, ensuring your bread holds its shape and has the right chewiness.
The Second Rise – Refining Texture:
Shape your dough into the desired loaf and allow it to rise again. This second rise is shorter, typically around 30 minutes. It refines the bread’s texture, making it lighter and airier. Keep an eye on the dough; it should rise just enough to achieve the desired volume but not over-proof, as this can lead to a dense, heavy loaf.
By carefully managing time and temperature during the rising process, you’re ensuring that the Jimmy Johns bread recipe turns out perfectly every time. This controlled environment allows the yeast to work its magic, transforming simple ingredients into a loaf that’s rich in flavor, with a texture that’s both soft and satisfyingly chewy.
Shaping the Bread: Techniques for the Perfect Loaf
Shaping the dough is a critical and artistic step in the Jimmy Johns bread recipe. It’s where you give your loaf its signature look and ensure even baking. By mastering a few simple techniques, you can shape your dough to mimic the iconic Jimmy Johns loaf, leading to a visually appealing and evenly baked result.
1. Preparing the Dough: After the second rise, gently deflate the dough. This process helps to redistribute the yeast, ensuring a uniform texture throughout.
2. Creating the Right Shape: Jimmy Johns loaves are known for their elongated, slightly flattened shape. To achieve this, start by flattening the dough into a rectangle on a lightly floured surface. The size of the rectangle should be slightly shorter than your baking tray.
3. Rolling the Dough: Begin at one short end of the rectangle and roll the dough tightly into a log. Pinching the seam closed at the end of the roll is crucial. This helps the loaf maintain its shape during the final rise and baking.
4. Tapering the Ends: For that classic Jimmy Johns look, slightly taper the ends of your loaf by gently rolling them back and forth. This creates the loaf’s characteristic slender ends.
5. Final Touches: Place the shaped loaf seam-side down on your baking tray lined with parchment paper. This positioning ensures a smooth, even crust on top.
6. Scoring the Bread: Just before baking, make a few shallow cuts along the top of the loaf with a sharp knife. This not only adds to the aesthetic but also helps the bread expand evenly as it bakes.
Mastering these shaping techniques is essential to replicating the Jimmy Johns bread recipe at home. It’s a process that combines precision and artistry, resulting in a loaf that’s not only delicious but also a feast for the eyes.
Baking Tips: Oven Temperatures and Times
Achieving the perfect bake is a crucial step in the Jimmy Johns bread recipe. The oven temperature and baking time are pivotal in ensuring your loaf turns out with the desired crust and texture, mirroring the quality of Jimmy Johns’ renowned bread. Here’s how to nail these aspects for a flawless baking experience.
1. Preheat Your Oven:
Start by preheating your oven. A consistent, hot temperature is vital for a good rise and crust formation. For the Jimmy Johns bread recipe, an oven temperature of around 350°F (175°C) is ideal. Preheating your oven ensures the dough starts cooking immediately, contributing to a better rise.
2. Positioning the Dough in the Oven:
Place your bread in the middle rack of the oven. This position allows for even heat distribution, crucial for consistent baking and a uniformly golden crust.
3. Baking Time Matters:
Typically, a loaf will take about 25 to 30 minutes to bake. However, this can vary based on your oven and the size of your loaf. You’re aiming for a golden-brown crust and a hollow sound when you tap the bottom of the loaf. These are the classic signs that your bread is perfectly baked.
4. Steam for a Crispier Crust:
If you prefer a crispier crust, like the one found in Jimmy Johns sandwiches, introduce steam into your oven. You can do this by placing a tray of water on the bottom rack or spraying the oven walls with water right after placing the dough inside. Steam during the initial baking phase helps in achieving a crispy, shiny crust.
5. Cooling Down:
After baking, let your bread cool on a wire rack. This step is essential as it allows the inside of the loaf to settle and develop its texture.
By following these oven temperature and time tips, you’ll be well on your way to baking a loaf that does justice to the Jimmy Johns bread recipe, bringing the delightful taste and texture of this famous bread right to your home kitchen.
Jimmy Johns Bread Recipe
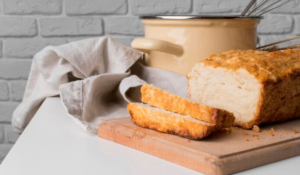
Recreate the delicious Jimmy Johns bread in your kitchen with this easy-to-follow recipe. This recipe will guide you through the process of making a loaf that closely resembles the soft, yet slightly crusty bread that Jimmy Johns is famous for.
Ingredients:
- 4 cups bread flour
- 1 tablespoon granulated sugar
- 2 teaspoons salt
- 1 packet (2¼ teaspoons) active dry yeast
- 1½ cups warm water (about 110°F)
- 1 tablespoon olive oil (for greasing)
Instructions:
- Activate the Yeast: In a small bowl, dissolve the sugar in warm water. Sprinkle the yeast over the top and let it sit for 10 minutes until frothy.
- Mix the Dry Ingredients: In a large mixing bowl, whisk together the bread flour and salt.
- Combine the Ingredients: Make a well in the center of the flour mixture. Pour in the activated yeast mixture. Gradually mix the flour into the liquid, stirring until a dough forms.
- Knead the Dough: Transfer the dough to a lightly floured surface. Knead for about 10 minutes, or until the dough is smooth and elastic.
- First Rise: Place the dough in a greased bowl, turning it once to coat the top. Cover with a damp cloth and let it rise in a warm, draft-free area until it doubles in size, about 1 hour.
- Shape the Loaf: Punch down the risen dough and shape it into a log. Place it on a baking tray lined with parchment paper.
- Second Rise: Allow the dough to rise again for about 30 minutes.
- Preheat the Oven: Preheat your oven to 350°F (175°C).
- Bake the Bread: Bake the bread for 25-30 minutes, or until the crust is golden brown and the loaf sounds hollow when tapped.
- Cool: Remove the bread from the oven and let it cool on a wire rack.
Enjoy your homemade Jimmy Johns bread as a standalone treat or as part of a delicious sandwich!
Variations on the Classic Recipe: Adding Your Own Twist
Experimenting with the classic Jimmy Johns bread recipe allows you to add a personal touch while maintaining its beloved qualities. Here are some creative variations to spice up the traditional recipe, infusing new flavors and textures into your homemade bread.
1. Whole Wheat Twist: For a healthier version, replace half of the bread flour with whole wheat flour. This switch adds a nutty flavor and a denser texture, perfect for a more substantial sandwich.
2. Herbs and Garlic: Elevate the flavor by adding minced garlic and a mix of dried herbs like rosemary, thyme, and oregano to the dough. This variation is ideal for an aromatic, savory loaf that pairs excellently with soups and salads.
3. Cheese and Jalapeño: Add shredded cheddar cheese and finely chopped jalapeños to the dough for a spicy kick. This combination creates a loaf with a delightful balance of heat and creaminess.
4. Olive Oil and Sea Salt: Brush the top of your loaf with olive oil and sprinkle sea salt before baking. This simple addition gives the bread a Mediterranean flair and a beautifully crisp crust.
5. Multigrain Adventure: Mix in a variety of seeds like sunflower, pumpkin, and sesame into the dough. A multigrain Jimmy Johns bread recipe not only adds a crunchy texture but also boosts the nutritional value.
6. Sweet Cinnamon Raisin: For a sweet twist, incorporate cinnamon and raisins into the dough. This version is great for breakfast or as a snack, offering a delightful contrast to the original savory profile.
These variations on the Jimmy Johns bread recipe provide an exciting way to customize your baking experience. Whether you’re aiming for healthier options or seeking new flavor profiles, there’s always room to experiment and make the recipe your own.
Storing and Preserving Your Homemade Bread for Freshness
After mastering the Jimmy Johns bread recipe, the next crucial step is storing and preserving your homemade bread to maintain its freshness and flavor. Here are practical tips to keep your bread tasting as delightful as the day you baked it.
1. Cool Completely Before Storing: Let your freshly baked bread cool to room temperature. Storing it while it’s still warm can lead to moisture buildup, making the bread soggy.
2. Use Bread Boxes or Bags: Store your bread in a bread box or a cotton bread bag. These storage methods allow just enough air circulation to keep the crust crisp while maintaining the bread’s internal moisture.
3. Avoid Plastic for Long-Term Storage: While plastic bags can keep bread soft, they also trap moisture, hastening the growth of mold. For short-term storage, plastic is fine, but for longer periods, stick to bread boxes or cotton bags.
4. Slice as Needed: Keep your bread in a whole loaf and slice it only when you’re ready to eat. This minimizes the exposed surface area, keeping the bread fresher for longer.
5. Refrigeration is Not Ideal: Contrary to popular belief, refrigerating bread actually makes it go stale faster. The cold environment speeds up the recrystallization of starches, leading to hard and dry bread.
6. Freezing for Longevity: If you can’t consume the bread within a few days, freezing is your best option. Slice the bread, wrap it tightly in aluminum foil or freezer-safe plastic wrap, and freeze. When you’re ready to eat, simply thaw and reheat in the oven for fresh-tasting bread.
By following these storage tips, you can extend the life of your homemade Jimmy Johns bread, ensuring that every slice is as satisfying as the first. Proper storage not only preserves the bread’s texture and taste but also reduces food waste, allowing you to enjoy your baking efforts for longer.
Common Mistakes to Avoid When Making Bread
Perfecting the Jimmy Johns bread recipe requires avoiding common baking pitfalls. Here’s a concise guide to sidestepping these mistakes for a successful bake every time:
1. Incorrect Yeast Activation: The right water temperature is crucial for yeast. Use lukewarm water (about 110°F), as too hot can kill the yeast and too cold won’t activate it.
2. Kneading Issues: Balance is key in kneading. Under-kneaded dough won’t develop enough gluten, leading to a dense loaf, while over-kneading makes the bread tough. Aim for a smooth, elastic dough.
3. Inaccurate Ingredient Measurements: Precise measurements are vital in baking. Always use a scale for ingredients to follow the Jimmy Johns bread recipe accurately.
4. Rushing the Rise: Allow enough time for the dough to rise properly. It should double in size for optimal texture and flavor.
5. Skipping Preheat: A fully preheated oven is essential. Placing dough in a cold oven will affect its rise and texture.
6. Dough Temperature Matters: The dough should be kept in a warm, draft-free area for consistent rising. Too cold and it rises slowly; too warm, and it may overproof.
By steering clear of these common errors, you’ll enhance your chances of baking bread that matches the quality and taste of the Jimmy Johns bread recipe. Remember, bread making is an art that improves with practice and attention to details.
Expert Tips for Perfecting Your Baking Technique
Enhancing your bread-making skills, especially when attempting the Jimmy Johns bread recipe, requires a blend of precision, patience, and a few expert tips. Here’s a concise guide to perfecting your baking technique:
1. Yeast Mastery: Know your yeast. For the Jimmy Johns bread recipe, active dry yeast is ideal. Ensure the water is lukewarm (110°F to 115°F) for optimal activation.
2. Temperature Control: The dough’s rising temperature is as crucial as the water temperature. Find a consistently warm spot for the dough to rise properly.
3. Accurate Measurements: Baking is a science; precise measurements are key. Use a digital scale for the most accurate ingredient ratios.
4. Kneading Technique: Kneading develops the bread’s texture. Aim for a smooth, elastic dough and test its readiness with the windowpane test—stretching the dough to see if it forms a thin, translucent membrane without tearing.
5. Patience in Rising: Allow the dough to fully rise during the first fermentation. This step is vital for flavor development and texture enhancement.
6. Shaping the Dough: Shape your loaf carefully. Proper shaping ensures even baking and an aesthetically pleasing loaf.
7. Understanding Your Oven: Every oven is different. Use an oven thermometer to confirm accurate temperatures and understand your oven’s hot spots.
8. Cooling the Bread: Let the bread cool on a wire rack before slicing. Cooling completes the baking process and solidifies the bread’s structure.
By integrating these tips into your baking routine, you’ll be well on your way to making bread that rivals the Jimmy Johns bread recipe. Remember, practice and attention to detail are the keys to baking success.
Innovative Bread Baking: Exploring New Techniques
Venturing beyond traditional methods can transform your approach to the Jimmy Johns bread recipe, infusing innovation into your baking process. Exploring new techniques not only enhances your skills but also brings a fresh perspective to the classic recipe. Here are some exciting approaches to consider:
1. Sourdough Starter: Incorporate a sourdough starter into the Jimmy Johns bread recipe for a unique twist. This method introduces a tangy flavor and improves the bread’s texture. Begin by replacing a portion of the yeast with an equal amount of active sourdough starter.
2. Cold Fermentation: Try a cold fermentation process. Slowly ferment the dough in the refrigerator for 24 to 48 hours. This method enhances the bread’s flavor complexity and improves texture.
3. Autolyse Technique: Before mixing all the ingredients, combine just the flour and water. Let this mixture rest for about 20 to 30 minutes. This technique, known as autolyse, helps in gluten development, making the dough easier to work with and improving the final bread’s texture.
4. Steam Baking: Create a steamy environment in your oven. Place a pan of water on the bottom rack or throw ice cubes into the oven as you bake. Steam during the initial baking phase results in a shinier, crispier crust.
5. Poolish Pre-ferment: Use a poolish, a type of pre-ferment, to enhance the bread’s flavor and shelf life. Mix equal parts flour and water with a small amount of yeast, and let it ferment overnight. Incorporate this into your dough.
6. Lamination Technique: Fold the dough like puff pastry to incorporate layers of butter or oil. This method, known as lamination, creates a flaky, tender texture, adding a luxurious feel to the Jimmy Johns bread recipe.
By embracing these innovative techniques, you not only challenge yourself as a baker but also add new dimensions of flavor and texture to your homemade Jimmy Johns bread. This exploration allows you to creatively tailor the recipe, making each loaf uniquely your own.
Q&A: Answering Your Most Common Bread Baking Questions
Baking the perfect loaf, especially when following the Jimmy Johns bread recipe, often brings up questions. Here are answers to some of the most common queries to help you achieve baking success.
Q: Why didn’t my bread rise properly?
A: Improper rising can result from several factors. The yeast might be old or inactive, the room temperature too low, or the dough not kneaded sufficiently. Ensure your yeast is fresh, the dough is kept in a warm environment, and you knead it until it’s smooth and elastic.
Q: Can I use all-purpose flour instead of bread flour in the Jimmy Johns bread recipe?
A: While you can use all-purpose flour, bread flour is recommended for its higher protein content, which contributes to better gluten development and a chewier texture.
Q: How long should I knead the dough?
A: Generally, knead the dough for about 10 minutes. You’re aiming for a smooth, elastic texture. A good test is the windowpane test: a small piece of dough should stretch between your fingers without tearing.
Q: What’s the best way to store homemade bread?
A: Store bread in a bread box or a cotton bag for short-term use. Avoid plastic as it traps moisture and can make the crust soggy. For longer storage, slice and freeze the bread.
Q: Can I speed up the rising process?
A: While it’s tempting to speed up the process, slow and steady wins the race in bread making. A rushed rise can lead to underdeveloped flavors and textures. If you’re short on time, a slightly warmer spot can help, but don’t overdo it.
Q: My crust is too hard. What can I do?
A: If your crust is too hard, it could be due to overbaking or not enough moisture during baking. Try reducing the baking time or introducing steam into the oven at the beginning of the bake.
These answers should guide you in your journey to perfect the Jimmy Johns bread recipe, turning common baking challenges into delicious success.
Conclusion: The Joy of Making and Sharing Homemade Bread
Embarking on the journey of bread making, particularly mastering the Jimmy Johns bread recipe, is more than a culinary endeavor; it’s a heartwarming experience that blends art, science, and a dash of love. The process, from mixing the ingredients to pulling a golden loaf out of the oven, is deeply satisfying. There’s a unique joy in witnessing simple ingredients transform into a beautiful, aromatic loaf of bread.
Sharing your homemade bread with family and friends adds to this joy. It’s not just about the flavors and textures, which, when following the Jimmy Johns bread recipe, are undoubtedly delightful. It’s about the connections and memories you create and share. Homemade bread, warm from the oven, has a way of bringing people together, sparking conversations, and creating a sense of comfort and belonging.
Furthermore, the skills you develop through bread making are invaluable. Each loaf is a learning experience, teaching patience, precision, and creativity. The more you bake, the more you understand the nuances of the process, allowing you to add your personal touch to each recipe.
In a world where everything is fast-paced and readily available, taking the time to bake bread from scratch is a grounding and therapeutic process. It’s a reminder of the simpler joys in life and the satisfaction that comes from creating something with your own hands.
In conclusion, whether you’re a seasoned baker or a beginner, the journey of making and sharing homemade bread, particularly the Jimmy Johns bread recipe, is rewarding. It’s an adventure that nourishes not just the body, but also the soul. So, embrace the flour, yeast, and the magic they create, and enjoy the wonderful world of bread making.