🍞 Easy No-Fail Homemade Bread (That’ll Make You Feel Like a Kitchen Hero!)
Hey there, fellow home baker! Chef Hannah here, and today I’m rolling up my sleeves to walk you through one of the best beginner-friendly bread recipes I’ve ever stumbled upon. If you’ve tried loaf after loaf and ended up with bricks instead of bread, friend—you are not alone. But this recipe? It’s your redemption story. It’s quick, it’s foolproof, and it delivers not one but two golden, fluffy loaves that will fill your kitchen with the kind of warm, cozy smells that make people randomly drop by “just to say hi.” (Spoiler alert: they’re here for the bread.)
Let’s dig into how this humble homemade loaf became the only bread recipe I’ve had consistent success with—and why it’s about to become your go-to too.
🛒 Ingredients: Simplicity Is the Secret
What I love most about this bread is that it doesn’t ask you to clear the shelves at a fancy grocery store. You probably already have everything you need in your kitchen:
-
2 cups warm water (not hot, just cozy-warm like bath water)
-
1/4 cup sugar
-
1 ½ tablespoons yeast (active dry yeast works perfectly)
-
1 ½ teaspoons salt
-
1/4 cup vegetable oil
-
5 ½ cups flour (All-purpose is totally fine—no need for special bread flour!)
🥄 Step-by-Step: From Bowl to Beautiful Loaf
Here’s how this bread magic comes together. Trust the process—it’s been tested, tweaked, and treasured in my kitchen.
1. Start with the Warm Water & Sugar
In a large mixing bowl, dissolve the sugar in warm water. Think of this like prepping a spa bath for your yeast—it’s how you wake them up sweetly.
2. Add the Yeast & Let It Proof
Next, sprinkle the yeast over the sugar water. Stir gently, then let it sit for about 5-10 minutes. You’ll know it’s ready when it gets foamy on top—like a coffee with crema. That’s proof (pun intended) your yeast is alive and kickin’!
💡 Friendly tip: If nothing happens, your water may be too hot (which kills yeast), too cold (they won’t wake up), or the yeast might be old. Try again with fresh yeast and cozy-warm water (around 110°F).
3. Add the Oil
Once your yeast mixture is bubbly and ready, stir in the vegetable oil. It gives your bread moisture and that tender crumb you’ll love.
4. Mix Dry Ingredients Separately
In another bowl, combine your flour and salt. Salt gives the bread flavor, but it can also slow down yeast if added too soon. That’s why we mix it into the flour first—balance, baby!
5. Combine Wet & Dry—One Cup at a Time
Start adding the flour mixture to the yeast mixture one cup at a time, stirring as you go. You can use a sturdy spoon, dough hook, or even your hands. Once it starts looking like shaggy dough, switch to kneading mode.
6. Knead Until Smooth and Soft
Turn the dough onto a lightly floured surface and knead for 3–5 minutes. You’re not trying to wrestle it—just fold and press gently until it feels soft, springy, and a little elastic.
💪 Kneading tip: If the dough’s too sticky, sprinkle with a touch more flour. But don’t overdo it—we want moist bread, not dry bricks.
7. Let It Rise
Place the dough in a large oiled bowl, then flip it over so both sides are coated. This keeps it from drying out while it rises. Cover with a clean towel or plastic wrap and let it rise in a warm place for about 1 hour, or until it’s doubled in size.
☀️ No warm spot? Pop it into an unheated oven with just the oven light on. Instant proofing box!
8. Punch It Down (Gently)
Give the dough a good punch—this deflates it and redistributes the yeast. Now, divide it in half and shape each piece into a loaf. Tuck and roll it into a smooth log and place it into two greased bread pans.
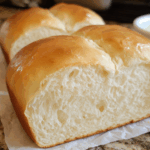
9. Second Rise (Almost There!)
Let the shaped loaves rise again for 30–40 minutes, or until the dough is slightly puffed above the edge of the pan. This step helps the loaves get that classic rounded top.
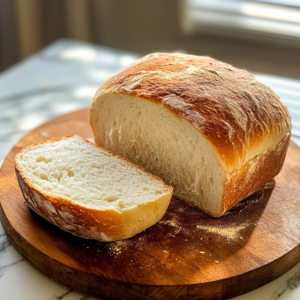
10. Bake to Golden Perfection
Preheat your oven to 350°F and pop the pans in the center rack. Bake for about 30 minutes, or until the tops are beautifully golden and the loaves sound hollow when tapped.
11. Butter Those Beauties
While the bread is still warm, brush the tops with butter. Not only does it add flavor, but it gives the crust a gorgeous soft sheen.
😍 Optional: sprinkle a pinch of flaky salt or garlic powder for extra flavor!
💬 Why This Bread Recipe Works (When Others Don’t)
Let’s be real: homemade bread can feel intimidating. But this recipe removes the guesswork. No fancy stand mixer needed, no hard-to-find ingredients, and no stretch-your-wrists-for-20-minutes kneading.
Here’s why it works every time:
-
The sugar jump-starts the yeast
-
Oil keeps it moist, not dry
-
Two rises create texture and lightness
-
It’s flexible—use it for sandwich bread, toast, or even French toast!
🥪 How to Use It: Bread Bliss Every Day
You’ve got two loaves of warm, fresh bread… now what?
Here are my favorite ways to enjoy it:
-
Classic Toast: Buttered with a drizzle of honey or jam.
-
French Toast Heaven: Slice thick and soak in cinnamon-vanilla egg custard.
-
Grilled Cheese Upgrade: Crispy outside, gooey inside.
-
Sandwich Bread: Turkey, BLT, chicken salad—name it!
-
Bread Bowls: Hollow out a loaf and fill with creamy soup.
🍽️ Pro tip: Slice and freeze one loaf for later. It toasts beautifully straight from the freezer!
🧁 Variations to Try
Ready to experiment? Here’s how to remix this recipe:
-
Honey Wheat Loaf: Replace 2 cups of flour with whole wheat, and use honey instead of sugar.
-
Garlic & Herb Bread: Mix 1 tsp Italian seasoning + 1 tsp garlic powder into the flour.
-
Cinnamon Swirl Bread: Roll dough flat, sprinkle cinnamon sugar, roll up into a loaf, and bake.
-
Cheddar Jalapeño Loaf: Stir in shredded cheese and chopped jalapeños after the first rise.
❄️ Storage Tips
-
Room Temp: Wrap loaves in plastic wrap or store in an airtight bag for 3–4 days.
-
Freezer-Friendly: Let loaves cool completely, then wrap tightly in foil + freezer bag. Keeps fresh for up to 3 months.
To reheat: warm in the oven at 300°F for 10–15 minutes or toast slices individually.
Easy No-Fail Homemade Bread
- Total Time: 2 hours
- Yield: 2 loaves
Ingredients
🧂 Ingredients:
• 2 cups warm water
• 1/4 cup sugar
• 1.5 tbsp yeast
• 1.5 tsp salt
• 1/4 cup vegetable oil
• 5.5 cups all-purpose flour
Instructions
-
Dissolve sugar in warm water. Add yeast and let it proof until foamy.
-
Stir in the oil.
-
In another bowl, mix flour and salt.
-
Gradually add the dry mixture to the wet, one cup at a time, mixing until a soft dough forms.
-
Knead the dough for 3–5 minutes.
-
Place dough in a greased bowl, turn to coat, and let rise for 1 hour.
-
Punch down the dough, shape into loaves, and place in greased pans.
-
Let rise 30–40 minutes.
-
Bake at 350°F for 30 minutes.
-
Brush tops with butter while warm
- Prep Time: 15 minutes
- Rise Time: 1.5 hours
- Cook Time: 30 mins
👩🍳 Final Thoughts: Bread Doesn’t Have to Be Complicated
If you’ve ever told yourself “I can’t bake bread,” this recipe is your invitation to prove yourself wrong—in the best, most delicious way. It’s forgiving. It’s simple. And it delivers that little miracle of baking we all crave: warm, fresh bread that tastes like you worked way harder than you did.
I’ve made this recipe at midnight in a dorm room, during power outages (thank you gas oven!), and even once while camping with a Dutch oven. It never lets me down.
So grab your bowl, clear your counter, and get ready for that cozy, buttery bite of success. You’ve got this, chef. 🍞💛