If you’ve been searching for the perfect homemade bread recipe, look no further! Amish White Bread is a classic, time-tested loaf that’s beloved for its soft, fluffy texture, subtle sweetness, and incredible versatility. Whether you’re making sandwiches, toast, or just enjoying a slice with butter, this bread is bound to become a staple in your kitchen.
This easy-to-follow recipe has been saved and shared by millions because it delivers bakery-quality results every time. It’s simple to make, requires just a handful of ingredients, and freezes beautifully. Plus, you can make it by hand, with a stand mixer, or in a bread machine, making it the perfect bread for any level of baker.
Let’s get baking! 🍞

Why You’ll Love This Amish White Bread
✔ Soft, Fluffy, and Buttery – The texture of this bread is light, tender, and perfect for sandwiches, toast, or just enjoying with butter. Its melt-in-your-mouth quality makes it a favorite for all ages.
✔ Easy to Make – Even if you’re new to baking, this recipe is straightforward and foolproof. No special skills or complicated techniques are needed!
✔ Versatile & Customizable – Adjust the sweetness, swap the oil, or experiment with mix-ins like herbs, cheese, or cinnamon to create your own twist.
✔ Perfect for Sandwiches & Toast – This bread slices beautifully, making it great for sandwiches, French toast, or even homemade croutons.
✔ Kid-Friendly – The slight sweetness makes it appealing to kids, making it a great option for school lunches and breakfast.
✔ Freezer-Friendly – Make extra loaves and freeze them for later. Simply thaw and enjoy fresh bread anytime!
✔ No Preservatives – Unlike store-bought bread, this homemade version is made with simple, wholesome ingredients, ensuring a healthier and fresher loaf.
✔ Works in a Bread Machine – If you prefer a hands-off approach, this recipe can be easily adapted for a bread machine, making it even more convenient!
Ingredients (Makes 2 Loaves)
- 1 cup water (110°F)
- 1 pinch powdered ginger (optional – activates yeast)
- 1 cup milk (110°F)
- ⅔ cup sugar (adjust based on preference)
- 1½ tablespoons active dry yeast
- 1½ teaspoons salt
- ¼ cup vegetable oil (coconut oil or melted butter works well too!)
- 5½ cups bread flour (adjust as needed)
- 2 tablespoons melted butter (for brushing the tops)
Step-by-Step Instructions
Step 1: Activate the Yeast
- In a large mixing bowl, dissolve the sugar in warm water and milk.
- Whisk in the yeast (and powdered ginger if using).
- Let it sit for 5-10 minutes until it becomes foamy. This ensures your yeast is active and ready to work!
Step 2: Mix the Dough
- Stir in 1 cup of flour.
- Add salt and oil, then continue mixing.
- Gradually add the remaining flour, one cup at a time, until a soft dough forms.
Step 3: Knead the Dough
- If using a stand mixer, knead with a dough hook for 5 minutes.
- If kneading by hand, turn the dough onto a lightly floured surface and knead for 10 minutes, until smooth and elastic.
Step 4: First Rise
- Lightly oil a large bowl and place the dough inside.
- Cover with a damp cloth and let it rise in a warm place for 1 hour, or until doubled in size.
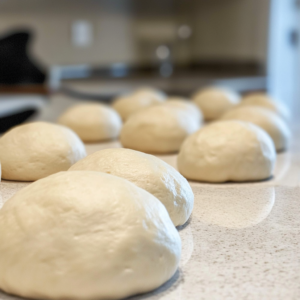
Step 5: Shape the Loaves
- Punch the dough down and knead for 3 minutes.
- Divide into two equal parts.
- Shape each portion into a loaf and place into greased 9×5-inch loaf pans.
- Brush with melted butter and let rise for another 30 minutes, or until the dough rises 1 inch above the pans.
Step 6: Bake to Perfection
- Preheat the oven to 350°F.
- Bake for 30 minutes, or until golden brown and hollow-sounding when tapped.
- An instant-read thermometer should register 190°F when inserted into the center.
Step 7: Cool & Enjoy!
- Brush the warm loaves with more butter for a soft crust.
- Let them cool for 5 minutes in the pan, then transfer to a wire rack.
- Enjoy fresh, or store for later!
Storage & Freezing Tips
Room Temperature: Store wrapped in plastic wrap or aluminum foil for up to 2 days.
Refrigerator: Keeps for up to a week in an airtight container.
Freezer: Wrap tightly and freeze for up to 3 months. Thaw at room temperature before serving.
Expert Tips for the Best Amish White Bread
- Use Warm Ingredients: Water and milk should be 110°F to help activate the yeast properly.
- Don’t Over-Knead: Kneading too much can make the bread dense.
- Check the Dough Consistency: If it’s too sticky, add a little more flour; if too dry, add a bit more water.
- Try Coconut Oil: It adds a subtle sweetness and keeps the bread extra soft.
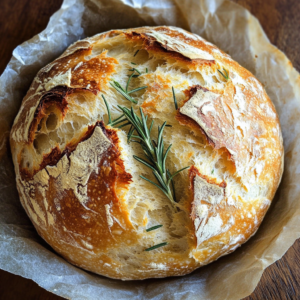
- Customize the Flavor: Add herbs, garlic powder, or even shredded cheese for a fun twist!
Bread Machine Instructions
If you prefer a hands-off approach, you can use a bread machine:
- Add ingredients in the order recommended by your bread machine.
- Select the white bread cycle and press “Start.”
- Once the first rise cycle is done, restart the machine so the dough gets a second rise before baking.
Common Questions
Can I use all-purpose flour instead of bread flour?
Yes! The texture may be slightly softer, but the recipe will still work.
Can I reduce the sugar?
Absolutely! Cutting the sugar in half will make it less sweet, but still delicious.
How do I know when my bread is done baking?
Tap the bottom of the loaf—if it sounds hollow, it’s ready! Or use a thermometer (190°F is perfect).
Why didn’t my bread rise properly?
Your yeast may be expired, or your kitchen may be too cold. Try proofing the dough in a warm oven with the light on.
Final Thoughts
Homemade Amish White Bread is one of the most rewarding baking projects you can take on. Whether you’re new to bread-making or a seasoned baker, this recipe is easy, forgiving, and always produces soft, fluffy, and delicious loaves.
It’s perfect for sandwiches, breakfast toast, or a cozy side for soups and stews. Plus, it freezes beautifully, so you can always have homemade bread on hand!
So, what are you waiting for? Try this Amish White Bread today and let us know
Print
🍞 Amish White Bread – Soft, Fluffy & Perfect Every Time! 🏡
- Total Time: 2 hours 30 minutes
- Yield: 2 Loaves
Description
There’s nothing like the warm, comforting aroma of freshly baked bread filling your kitchen! This Amish White Bread is tender, slightly sweet, and slices like a dream—perfect for sandwiches, toast, or just enjoying with a little butter. Kids love it, and it freezes beautifully, so you can always have a loaf on hand. With millions of saves and thousands of 5-star reviews, this recipe is a true winner! Let’s bake!
Ingredients
✅ 1 cup warm water (110°F)
✅ 1 cup warm milk (110°F)
✅ 1 pinch powdered ginger (optional – helps yeast activate)
✅ ⅔ cup sugar (adjust to taste)
✅ 1½ tbsp active dry yeast
✅ 1½ tsp salt
✅ ¼ cup vegetable oil, melted coconut oil, or melted butter (cooled to 100°F)
✅ 5½ cups bread flour (may need more or less)
✅ 2 tbsp melted butter (for brushing)
Instructions
1️⃣ Dissolve sugar in warm water and milk in a large bowl.
2️⃣ Whisk in yeast (and ginger if using) and let sit for 5-10 minutes until foamy.
3️⃣ Stir in 1 cup flour, salt, and oil.
4️⃣ Gradually add the remaining flour, one cup at a time, until dough pulls away from the bowl.
5️⃣ Knead for 5 minutes with a stand mixer or 10 minutes by hand until smooth and elastic.
6️⃣ Place dough in an oiled bowl, cover, and let rise for 1 hour (until doubled).
7️⃣ Punch dough down, knead for 3 minutes, and divide into two loaves.
8️⃣ Shape loaves and place into greased 9×5-inch loaf pans.
9️⃣ Brush tops with melted butter and let rise for 30 minutes.
🔟 Bake at 350°F (175°C) for 30 minutes, until golden brown and hollow-sounding when tapped.
🌟 Brush tops with butter after baking and cover with a tea towel while cooling.
Notes
🌡️ Storage: Wrap in plastic or foil for 2 days at room temp, or freeze for longer storage.
- Prep Time: 30 minutes
- Cook Time: 30 minutes
Nutrition
- Serving Size: 16 Slices
- Calories: 240 kcal per slice
- Sugar: 9g per slice
- Fat: 6g per slice
- Carbohydrates: 40g per slice
- Protein: 6g per slice