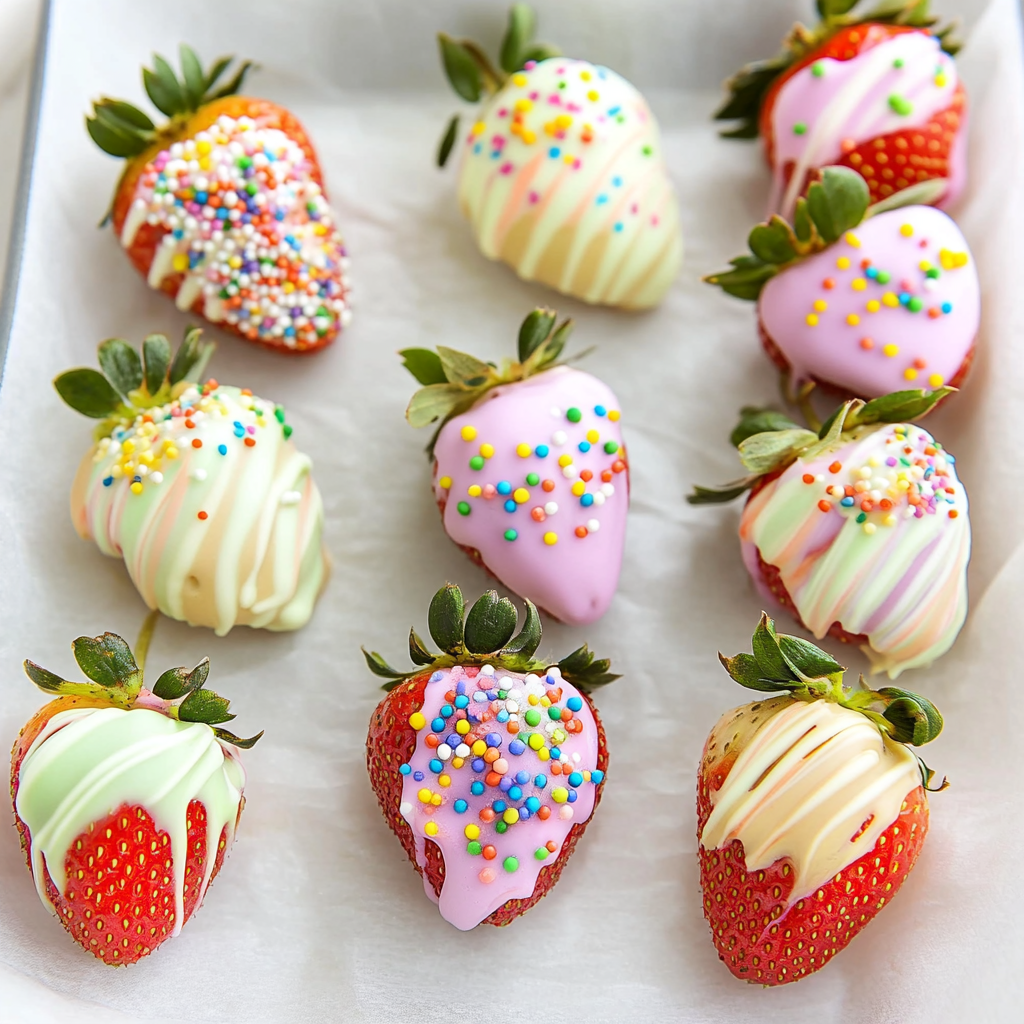

Easter is just around the corner, and if you’re looking for a fun, easy, and absolutely adorable treat to make, these Adorable Easter Strawberries are the perfect choice! Not only are they delicious, but they are also a festive and colorful addition to any Easter dessert table. Whether you’re making them for a family gathering, an Easter brunch, or as a gift for friends and loved ones, these chocolate-covered strawberries are guaranteed to bring smiles to everyone’s faces.
The best part? There is no right or wrong way to decorate them! You can get as creative as you like, using your favorite pastel-colored chocolates, sprinkles, or even candy decorations. So, let’s dive into this simple yet delightful Easter dessert recipe!

Why You’ll Love This Recipe
- Super easy to make – Requires minimal ingredients and effort.
- Customizable – You can decorate them in various ways to match your Easter theme.
- Perfect for all ages – Kids will have a blast helping decorate these adorable strawberries!
- Healthier sweet option – Strawberries add a fresh and fruity touch to the dessert.
- Great for gifting – Package them in a cute Easter box for a thoughtful homemade gift.
Ingredients You’ll Need
Before we start, let’s gather our ingredients. These are all easy to find and can be customized to your liking:
- 15-20 fresh strawberries – Make sure they are firm, ripe, and free from bruises.
- 1 cup Wilton’s White Chocolate Discs – For a smooth, creamy coating.
- 1/3 cup Wilton’s Chocolate Discs in pastel colors: Pink, Yellow, Teal, and Orange.
- Assorted Easter Sprinkles – Look for pastel-colored sprinkles, bunny shapes, or edible pearls for an extra festive touch.
If you prefer, you can also use regular white chocolate chips with a bit of coconut oil to help them melt smoothly.
Step-By-Step Instructions
Step 1: Prepare Your Ingredients
- Wash the strawberries under cold running water. Pat them dry thoroughly with a paper towel.
- Pro Tip: It’s crucial to dry them completely because any moisture on the strawberries can cause the chocolate to seize, making it difficult to coat them properly.
- Line a cookie sheet with parchment paper and set it aside. This will prevent the strawberries from sticking as they dry.
Step 2: Melt the Chocolate
- Place each color of chocolate discs into separate microwave-safe bowls.
- Heat the white chocolate first, microwaving in 15-30 second increments, stirring after each interval until completely smooth.
- Repeat the process with the pastel-colored chocolate discs.
- Avoid overheating! If the chocolate becomes too thick, you can add a tiny amount of coconut oil or vegetable shortening to thin it out.
Step 3: Dip the Strawberries
- Hold each strawberry by the stem and dip it into the melted white chocolate, ensuring it is evenly coated.
- Allow the excess chocolate to drip off, then carefully place the coated strawberry onto the parchment-lined tray.
- Repeat with the remaining strawberries, leaving some plain for drizzling later.
Step 4: Add Sprinkles and Drizzles
- Decorate immediately with Easter sprinkles while the chocolate is still wet. This helps them stick perfectly.
- Let the first layer dry before drizzling additional colors.
- Use a small spoon or piping bag to drizzle the pastel-colored chocolates over the coated strawberries. You can create patterns, zigzags, or swirls for a festive effect.
- Let them dry completely before serving.
Step 5: Serve and Enjoy!
Once the chocolate has set, your Easter Strawberries are ready to be served! Arrange them on a festive Easter platter or store them in an airtight container in the refrigerator for up to 24 hours.
Creative Decorating Ideas
While the classic chocolate dip and drizzle method is stunning on its own, here are some fun ways to take your Easter Strawberries to the next level:
- Bunny Faces: Use melted chocolate to draw cute bunny faces on the strawberries.
- Speckled Eggs: Dip in white chocolate and then lightly flick specks of colored chocolate using a clean toothbrush.
- Chick Strawberries: Use yellow-colored chocolate and add mini candy eyes with an orange sprinkle beak!
- Pastel Ombre: Blend different colors for a beautiful gradient effect.
- Glitter Glam: Edible glitter or shimmer dust can make your strawberries sparkle.
Storage Tips
- Refrigerate: Store in an airtight container in the fridge for up to 24-48 hours.
- Avoid Moisture: Chocolate-covered strawberries can “sweat” when removed from the fridge, so place a paper towel in the container to absorb moisture.
- Do Not Freeze: Freezing will cause the chocolate to crack, and the strawberries to become mushy once thawed.
Pairing Ideas
These Adorable Easter Strawberries pair well with other Easter treats. Serve them with:
- Easter Sugar Cookies
- Carrot Cake Cupcakes
- Mini Cheesecake Bites
- Pastel Macarons
- Homemade Marshmallow Peeps
For a beautiful Easter brunch, consider adding these strawberries to a charcuterie board with chocolates, nuts, and seasonal fruits.
Final Thoughts
These Easter Strawberries are the perfect way to celebrate spring! They’re not only delicious and festive, but they’re also easy to make, customizable, and a delightful project for the whole family.
Try out this recipe, get creative with your decorations, and most importantly—have fun! If you make these, be sure to share your creations on social media and tag your friends for an extra dose of Easter joy.
Print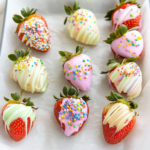
🌸🐰 Adorable Easter Strawberries – A Sweet Spring Treat! 🍓✨
- Total Time: 15 minutes
- Yield: 15-20 strawberries 1x
Ingredients
- 15–20 fresh strawberries
- 1 cup Wilton’s white chocolate discs
- 1/3 cup Wilton’s chocolate discs (pink, yellow, teal, orange)
- Assorted Easter sprinkles
Instructions
1️⃣ Melt each chocolate color in separate microwave-safe bowls following package directions.
2️⃣ Make sure the strawberries are completely dry before dipping (moisture makes the chocolate clump!).
3️⃣ Dip a strawberry into the white chocolate and place it on a parchment-lined cookie sheet. Let it dry before adding a drizzle of other chocolate colors.
4️⃣ For extra fun, dip a strawberry and immediately add Easter sprinkles!
5️⃣ Mix and match colors, sprinkles, and designs—there’s no wrong way to decorate!
Notes
Guilt-free indulgence!
- Prep Time: 15 minutes